


If you’re setting up a Nintendo Switch 2 for the first time, you’re probably raring to jump into Mario Kart World for a few laps. But if you’re eager to see what kind of improvements there are for older titles on the new console, you’re going to want to transfer your data from an original Switch.
Nintendo Switch 2 Could Launch With Almost No Reviews

The Switch 2’s System Transfer tool makes this a pretty simple process—but it can also be pretty hectic thanks to some improperly explained restrictions.
What is System Transfer?
For those of us who have a Nintendo Switch, System Transfer is a handy way to bring everything you need to the new console. Your accounts, save data, digital software, and more can be moved over in one fell swoop. You’ll have the opportunity to perform a System Transfer when you’re first setting up the Nintendo Switch 2.
One little wrinkle is that you can only do a System Transfer during the initial set up. It ends up feeling like quite a serious choice to have when getting ready for a new console. There are some manual options for transferring things over, but let’s go over the two System Transfer methods first:
- Cloud System Transfer: This uploads your original Nintendo Switch’s system data into a cloud server, after which it can then be downloaded onto your new console. The data can remain on the server for up to one year. It’s the ideal choice if you don’t plan on keeping the older console
- Local System Transfer: This will migrate your system data directly to the new console. You’ll need to have both consoles on hand and in proximity to each other. You might want to consider this if you do plan on keeping both consoles around
Does System Transfer delete anything?
Unfortunately, neither of these methods will move things over without deleting something on your original Nintendo Switch. Using the Cloud System Transfer will “initialize” your console after sending the data to Nintendo’s server. It turns out what that means is that your original Nintendo Switch will have everything deleted and be reset to factory settings. Anyone planning on still using the older console should avoid this option!
Local System Transfer will carry over all your necessary data without deleting everything instead. Any save data linked to Save Data Cloud Backup will also be copied so you’ll have both on each console. The only things that won’t remain are save data for games that aren’t supported by Save Data Cloud Backup (such as Pokémon games or Animal Crossing: New Horizons), as well as any User Accounts that aren’t linked to a Nintendo Account. These will instead be deleted from the original console and sent to the Nintendo Switch 2.
How to transfer save data
If you’re not keen on either System Transfer method, you can still move things over later. Continue setting up the Nintendo Switch 2 and sign in to your account(s). You can use the Virtual Game Card menu to bring over any digital games or DLC to your new console and start downloading them.
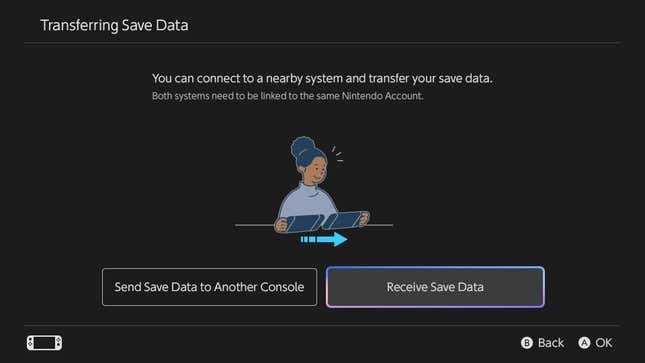
You’ll have to dig around in the settings to move your save data. But the process is relatively the same. Take the following steps for both consoles:
- Select System Settings on the Home Menu
- Scroll down to Data Management and then select Transfer Your Save Data
- Select Send Save Data to Another Console on your Nintendo Switch, and select Receive Save Data on your Nintendo Switch 2
- Choose and confirm all the save data you want to transfer over, and then keep the consoles close by until the transfer is complete
This is what I did when setting up the new console and it’s worked great! I’ve been able to continue my Pokémon Violet save in an uncomfortably smooth frame rate while my partner can still play Animal Crossing: New Horizons on the older console.
No matter if you use a system transfer or send things over the manual way, you’ll be ready to enjoy your new console. Try changing these five important settings to make the most of the system and prepare yourself for hours of playing Mario Kart World and beyond.
.
Source link


